NEWS
| UPDATE | [MODIFIED] November Update Patch Note - New Lancea Specialization | 11. 05. 2018 | Views 27392 |
|---|
Changelog
Changes / Additions
1. New Long Term Missions Added for New Guilds
2. Changes in Failed Enhancement Penalty
3. Guardian's Enhanced Talisman
4. Seasonal Points Store Revamp
5. Priestess of Darkness Nest Points Store
6. Forest Dragon Accessory Icon
7. Battle Training Ground Guide and Quest List Deactivated
8. Buff/Debuff UI Improvements
10. Unified Level Skill Revamp
11. Changes in Fissive Dimension and Kaeron Nest
12. Adjustments to Lv. 95 Legend Dragon Gem Disassembly Results
13. Added Function: Cancelling Mercenary Synthesis
14. Names Changed for Labyrinth Haildom Materials
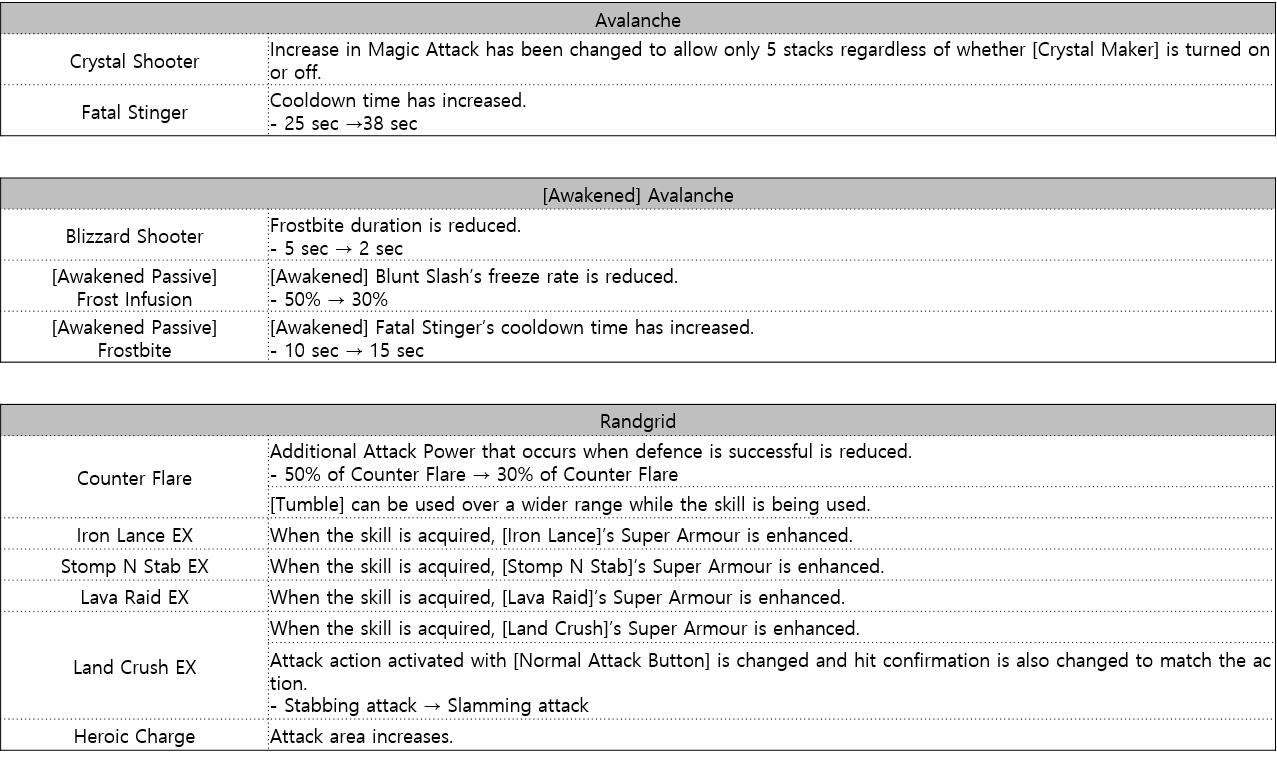
Skill Balancing
Event
1. Saint Haven Defence: Gorilla from the Star
Cash Shop Update
1. November Costume: Lingerie Costume
2. Gerrant Transformation Treasure Box (Casual Look) [MODIFIED]
Changelog
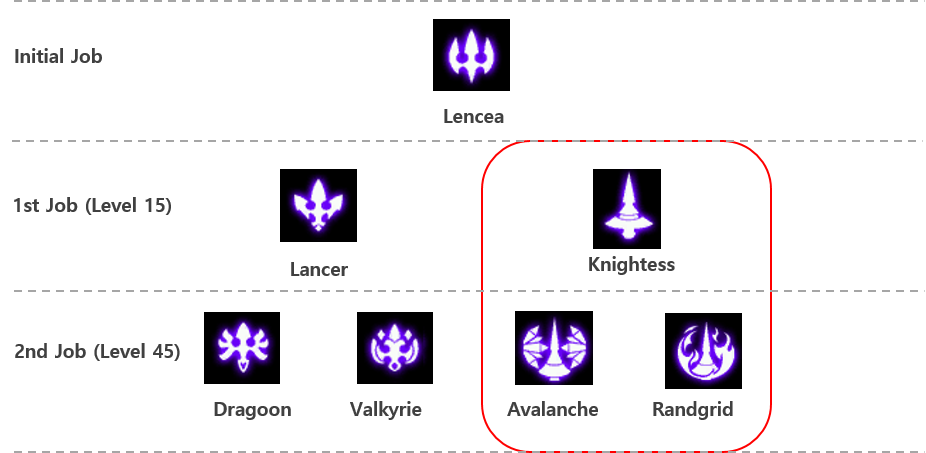
1. Specialization Tree
• Knightess is a new 1st specialization that Lenceas can choose.
• Knightess can specialize into Avalanche or Randgrid through 2nd specialization.
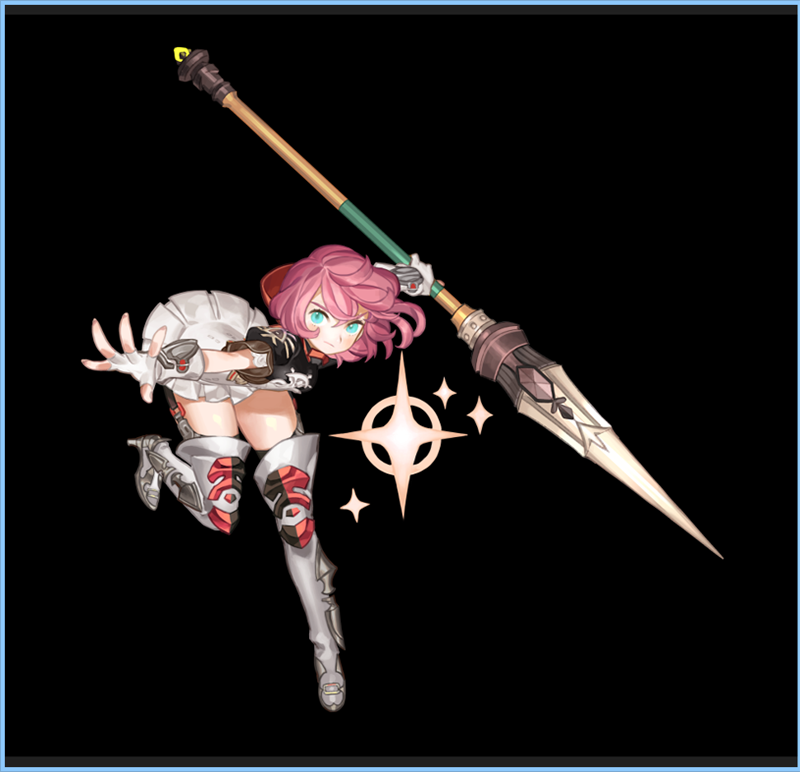
2. Job Description - Knightess
• Knightess is a melee fighter who wields a jousting lance.
• Her skills specialise in stabbing and charging at her enemies.
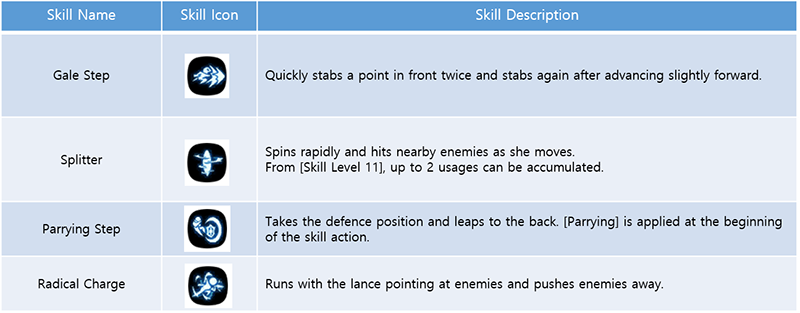
[Class and Skill Info]
• Knightess is a melee fighter who is largely affected by Strength and Physical Attack Power.
• She has the advantage of countering attacks from enemies with her ability to move and cancel skills freely.
• She has many skills that can pull enemies or launch enemies into the air and induce high paralysis.
[Main and Key Skills]
• [Gale Step] and [Splitter] have relatively short cooldown time so they can be useful to keep enemies in check. Furthermore, [Splitter] can attack and change position at the same time so it allows you to respond more actively to enemies’ attack patterns depending on how the skill is used.
• [Parrying Step] can be used immediately in all attack actions. Although it does not deal damage, its invulnerable duration is longer than other parrying skills.
• [Radical Charge] has high Super Armour Defence and pushes enemies away while charging forward.
2. Job Description - Avalanche
• Avalanche is a melee fighter who specialises in Water Attribute Magic Attacks.
• She can enhance her abilities using “Ice Spear”, which is her unique resource.
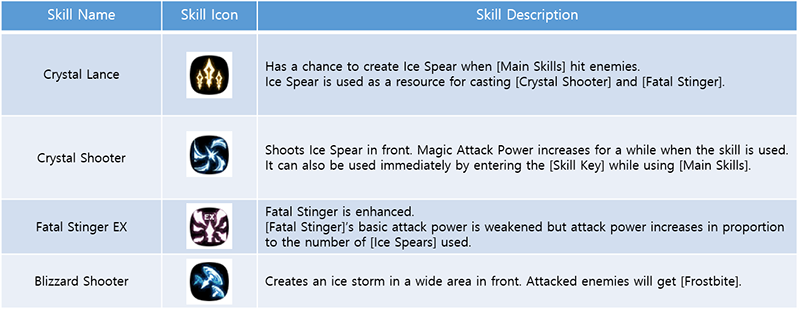
■ Class and Skill Info
• Avalanche is a melee fighter who is largely affected by Intellect and Magic Attack Power.
• She can attack endlessly with high number of hits and her abilities can be enhanced with the efficient use of Ice Spears that can be obtained at a set rate.
• After [Awakening], “Frostbite” and “Freeze” debuffs will be added to some skills to allow more advantage in battle.
■ Main and Key Skills
• Ice Spear created with [Crystal Lance] can be used when [Crystal Shooter] is used. Whenever it is used, own attack power increases and the effect can be stacked until a certain limit is reached.
• Ice Spear can also be used when using [Fatal Stinger EX]. The more Ice Spears used, the higher the increase in attack power.
• When [Awakening] is completed, [Fatal Stinger EX] with maximum attack power can be used without using resources when skills with Frostbite effect are used.
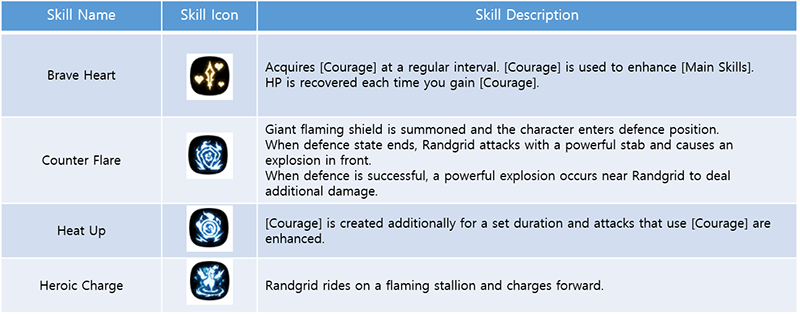
3. Job Description - Randgrid
• Randgrid is a melee fighter who specialises in Fire Attribute Physical Attacks.
• She can enhance her abilities using “Courage”, which is her unique resource.
◆ Awakening Quest ◆
• [Lv. 90][Awakening] New Power Beckons
• Players who have completed their 2nd specialization but have not taken the 2nd specialization quest can still take this Awakening quest.
(However, classes without Awakening cannot take the quest.)
• Players who have not completed 2nd specialization yet will be able to see the exclamation mark above the NPC's head but will not be able to take the quest.
• You can get the Awakening quest from Priestess of Darkness Mocha.
• When you accept the Awakening quest and complete all related quests, Awakening tab will become available in Skill window [K] and you can start using Awakened skills.
■ Note
Using Class Change Item to convert the Lancea character's previous job into Knightess, Avalanche, Randgrid is not possible.
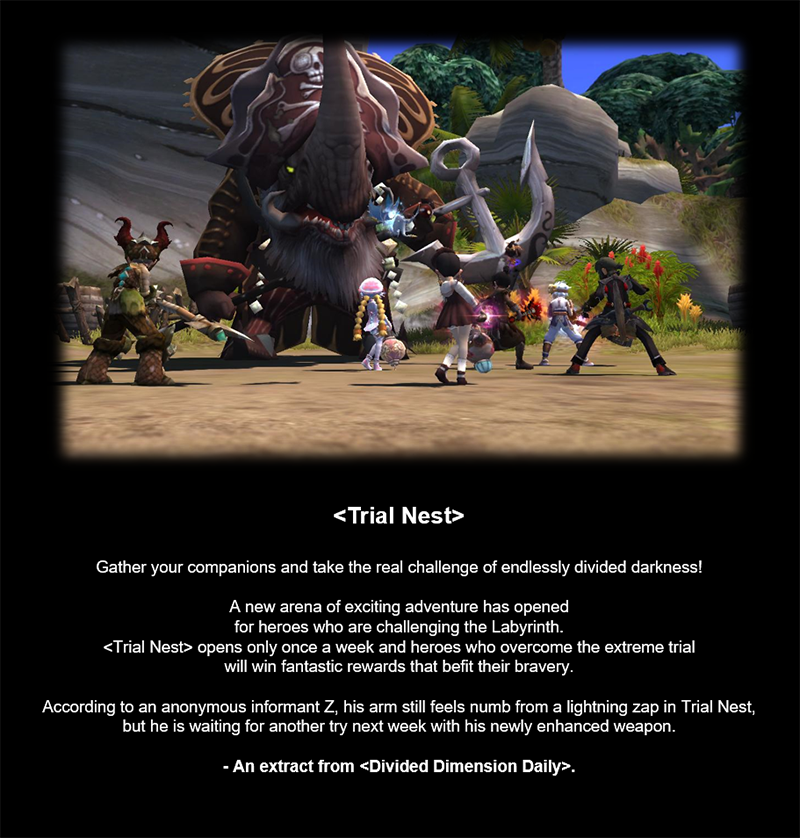
Key characteristics of [Trial Nest]
1. From playing [Trial Nest] once, you can get from 20 to 40 times more valuable rewards depending on the difficulty level compared to playing [Fission Nest] of the same level!
2. You can only enter in a raid party of 6 players.
3. You can only ENTER once a week. That means entry count will be taken immediately after you enter and you cannot enter again when you give up halfway.
4. The ratio of Monster’s HP per single player in [Fission Nest] will be fixed at [ 600% → 420% (HP for each player: 70% - same as 4-player Fission Nest) ]
5. [Trial Effect] will appear randomly during battle to challenge the players!
6. HP and MP will not be recovered when you clear the stage.
7. You can get [Dimension Rock] buff.
8. Like 8-player Nests, you cannot use recovery potions and elixirs.
※ Developer's Comments :
[Trial Nest] can be considered a “Fission Nest Challenge”.
Elements that help players to clear the Nest have been removed and instead, elements that hinder players have been added.
However, [Monster HP per player] is the same as 4-player Fission Nest so maybe the 6-player Trial Nest may seem easier when you enter at the same level.
Those who do not challenge themselves and settle at their current position will only be rewarded with rewards at that level. However, those who risk themselves and take the challenge will get special rewards for their effort.
Try taking the challenge of higher level Trial Nests in a 6-player Raid Party once a week to get fantastic rewards!
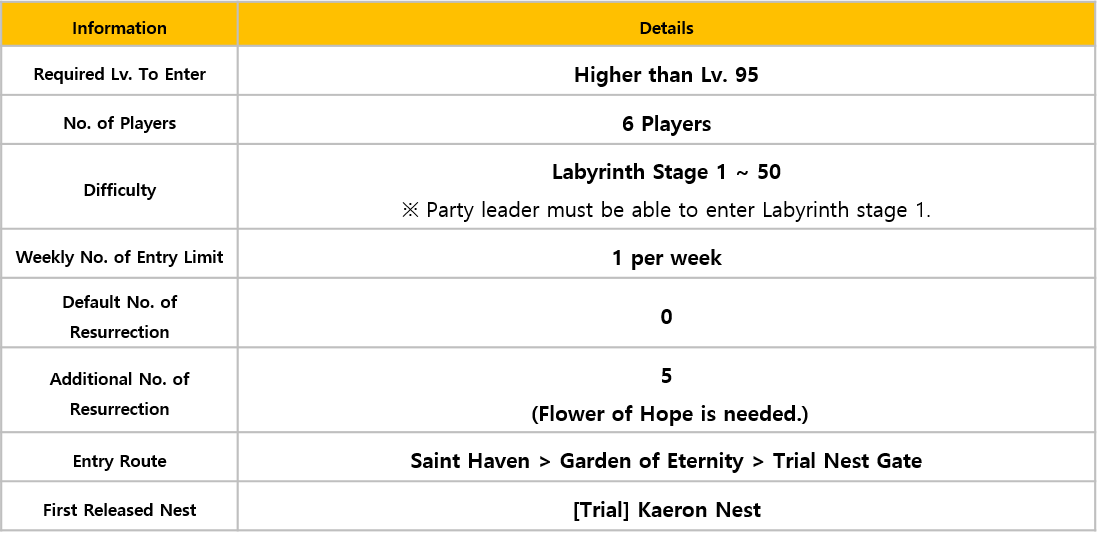
Entry Info
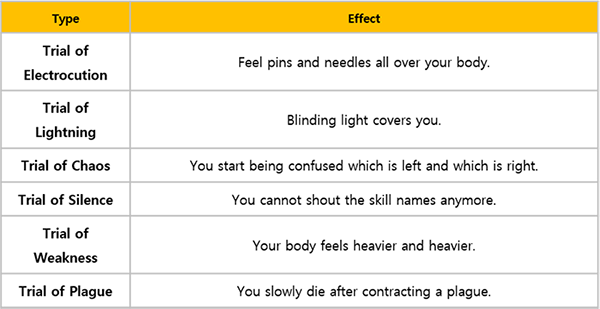
[Trial Effect] Details
1. Trial effect will be assigned randomly for each stage and it will not change until the stage ends.
2. Trial effect appears at a regular interval during battle. The interval will be reset each time an ordeal effect appears.
3. Trial effects are usually [hindrance effects] that make battle more difficult, but some effects may deal direct damage.
4. Trial effects are not related to monsters in battle and will affect players independently.
Rewards
[Fission Core] Main Characteristics
1. When you enter the dungeon, you will enter one of the randomly selected [Fission Nest] .
2. Items inside the reward chest that appears when you clear the dungeon are 4 times more than [Fission Nest] but 4 times more Blessing Points are needed.
※ [Gold/Silver chest] selected in the clear report window will not have 4 times the reward.
※ Only the relics of the cleared Nest will be dropped 4 times more and other relics will not be dropped.
3. There is no clear limit but a special [Entry Ticket] is needed to enter.
※ Developer's Comments :
[Fission Core] is a dungeon for users who wants to reduce the amount of time and Blessing Points required for clearing a round of Volcano/Guardian/Mist/Chiron Nest even if they have to [pay a certain fee].
Thus, players will find their own balance between [time and BP] and [amount to be paid].
[Entry Info]

※ [Fission Core] is exactly the same as [Division Nest] except for amount of FTG used, amount of rewards, and entry ticket.
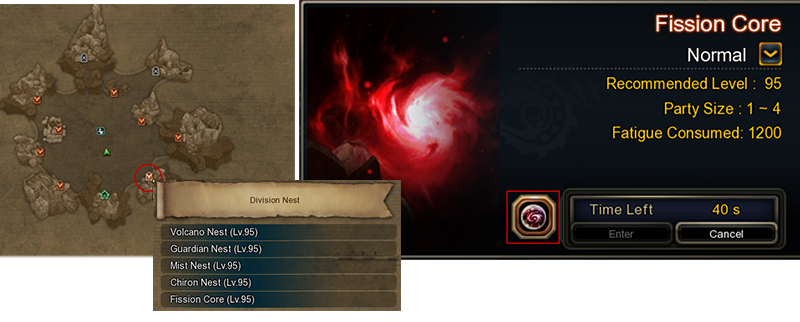
※ When you clear the Nest in [Fission Core], clear count for Daily/Weekly Tasks and Long-term Guild Mission’s “Clear [?] Nest x times” will only go up by 1.
- E.g. If you enter [Fission Core] and clear [Chiron Nest], clear count for the Weekly Task, “Clear Chiron Nest 15 times” will only go up by 1.
Fission Core Entry Ticket
• You can buy Fission Core entry ticket [Fissive Vortex] at Saint Haven’s [Crystal Store Helper Clara].
• You can get it at a set rate after clearing dungeons and Nests.
* Entry ticket is used when you enter Fission Core.

Fission Core Rewards
• You will get 4 times the completion reward for the level you have cleared.
(Not applicable for gold/silver chest selected at the clear report window)
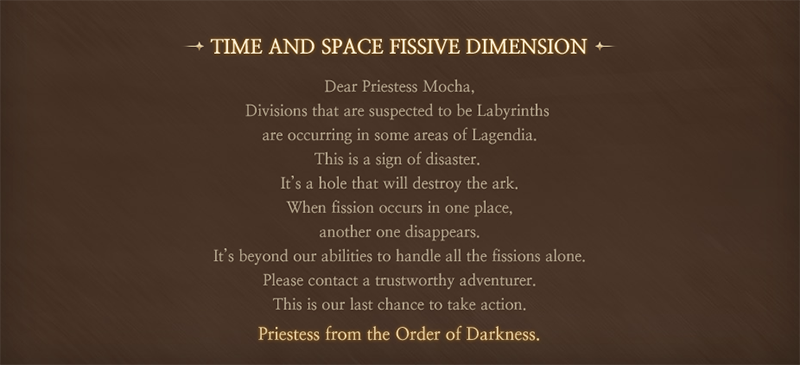

[Entry Info]

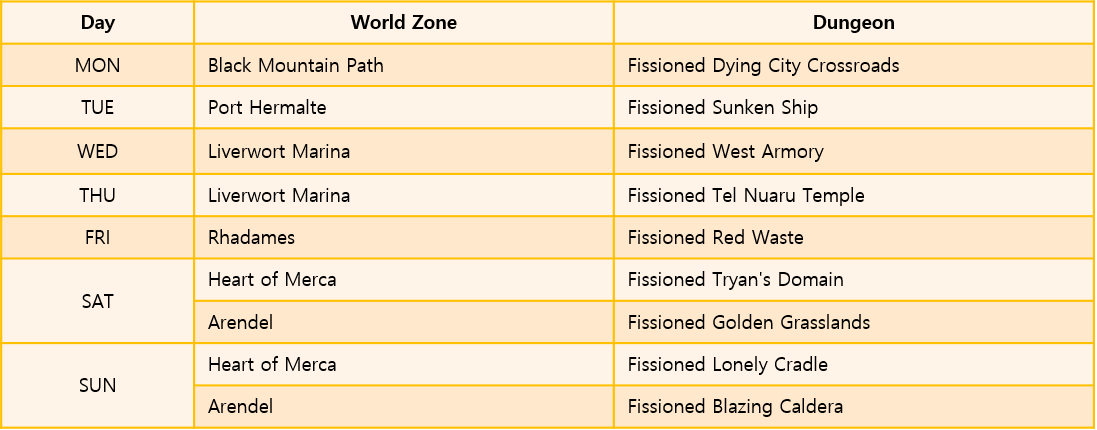
[Dungeon Entry Information]
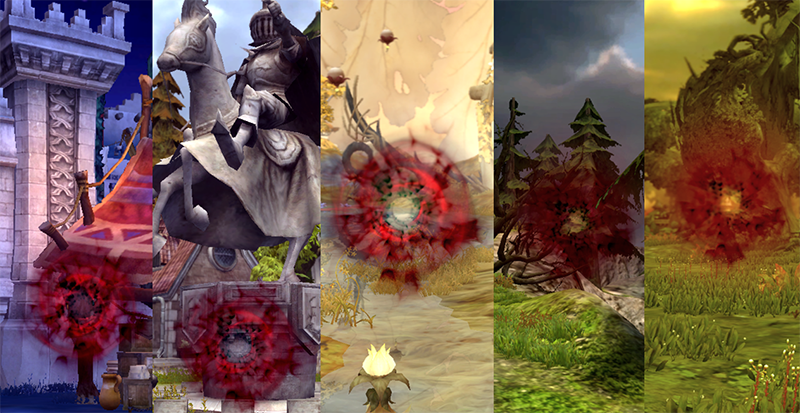
• It has been identified that the divided dungeons appear and disappear based on the day of the week.
• Please be aware that there have been reports saying the divided dungeons in Anu Arendel are more challenging to clear.
[Special Features]
1. You can get Dimension Rock buff when you have it in your Inventory when you enter.
2. There is a low chance of ‘Cliff Rose’ gate appearing and you can enter the ‘Rising Cliff’ through the gate.
3. You cannot enter if you do not have enough FTGs.
4. These dungeons are much harder to clear compared to normal dungeons. Be careful!
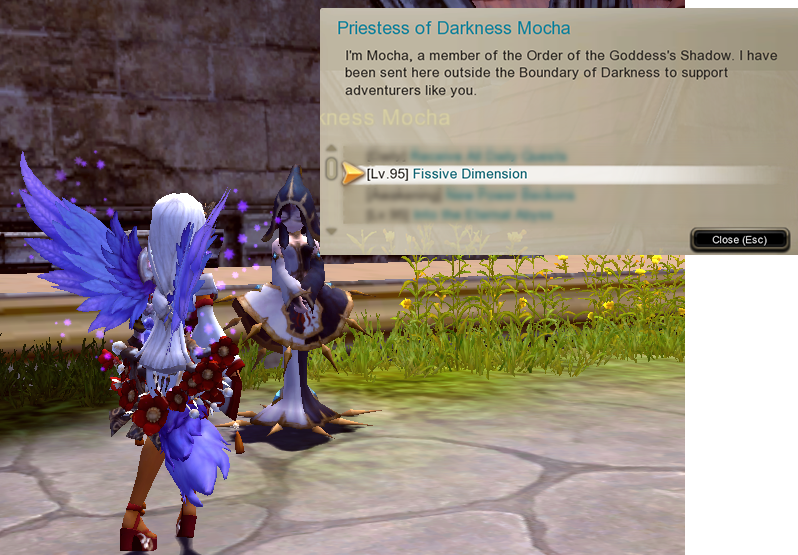
[Guide Quest]
※ You can get the quest from Priestess of Darkness Mocha in Saint Haven.
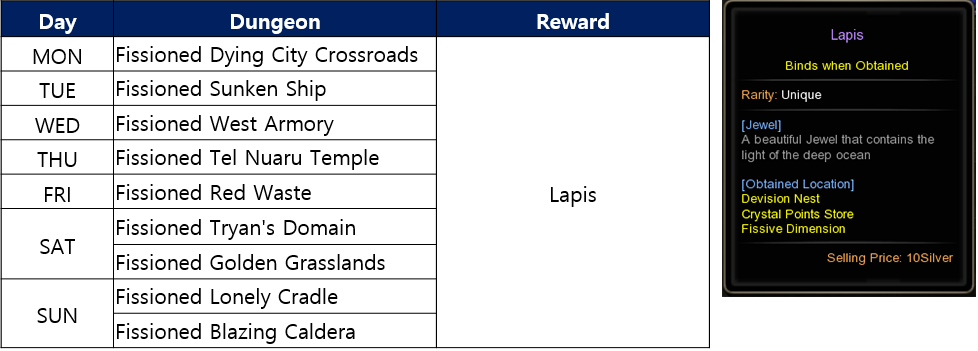
[Reward]
Changes / Additions
1. New Long Term Missions Added for New Guilds
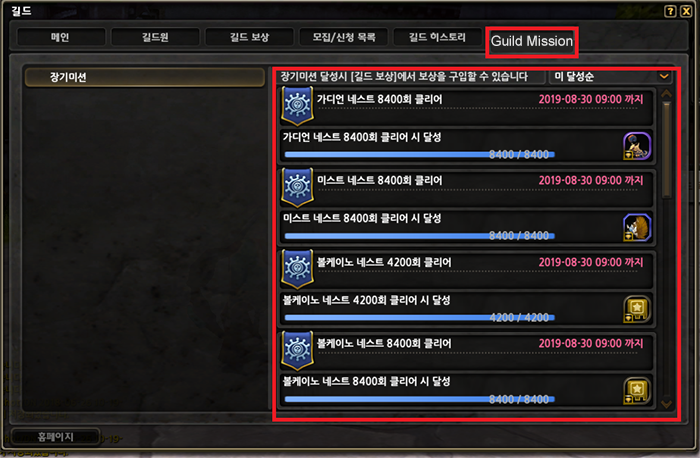
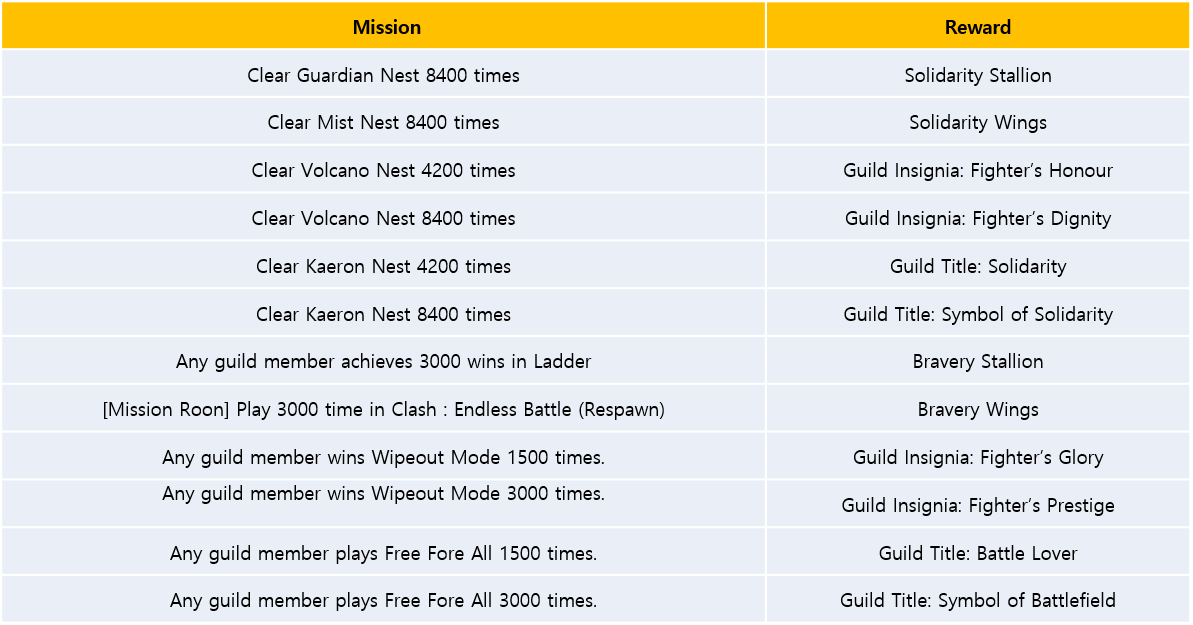
12 Long-term Guild Missions and their rewards have been added.
■ Long-term Guild Mission Information
- Long-term Guild Missions can be taken by all guild members.
- Long-term Guild Missions can be seen under Guild Missions in the Guild window.
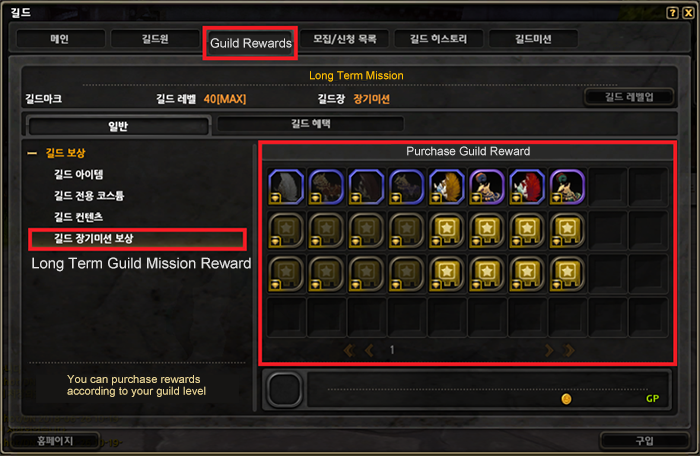
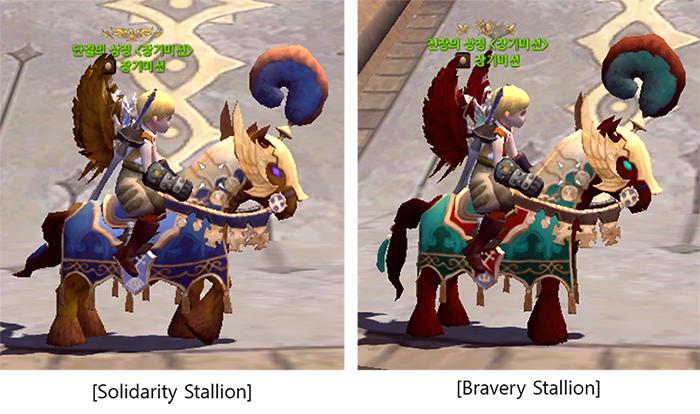
■ Long-term Guild Mission Rewards
- Long-term Guild Mission rewards can be purchased with Gold when you accomplish Long-term Guild Missions and meet level requirements.
- You can check the rewards in the Guild window at [Guild Rewards - Long-term Guild Mission Rewards].
2. Changes in Failed Enhancement Penalty
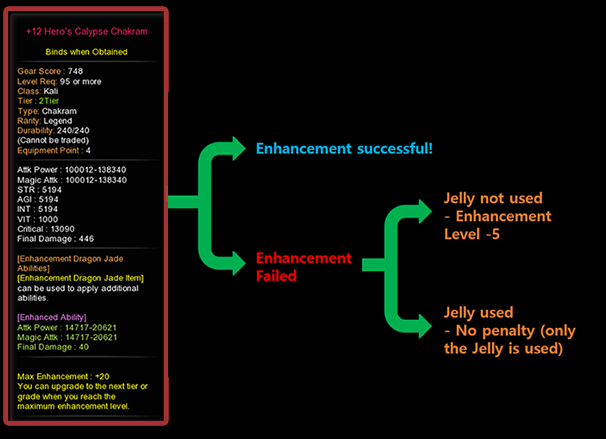
• Previously, Level 95 tiered items were destroyed at a set rate when enhancement failed at a certain enhancement level (when Item Protection Magic Jelly was not used).
• Now, the item will not be destroyed even when enhancement fails.
• Instead, there is a 100% chance of Enhancement Level falling by 5 levels when enhancement fails (when Item Protection Magic Jelly is not used).
• When Item Protection Magic Jelly is used, enhancement degrading does not occur even when enhancement fails.
• Number of Jellies needed to prevent a drop in enhancement level is the same as the amount needed to prevent equipment destruction.
• Item’s tier or grade remains unchanged even when its enhancement level drops. (E.g. Calypso Tier 2 Top +3 Enhancement Level → Failed Enhancement → Calypso Tier 2 Top +0 Enhancement Level)
3. Guardian's Enhanced Talisman
■ Upgrading Guardian's Enhanced Talisman
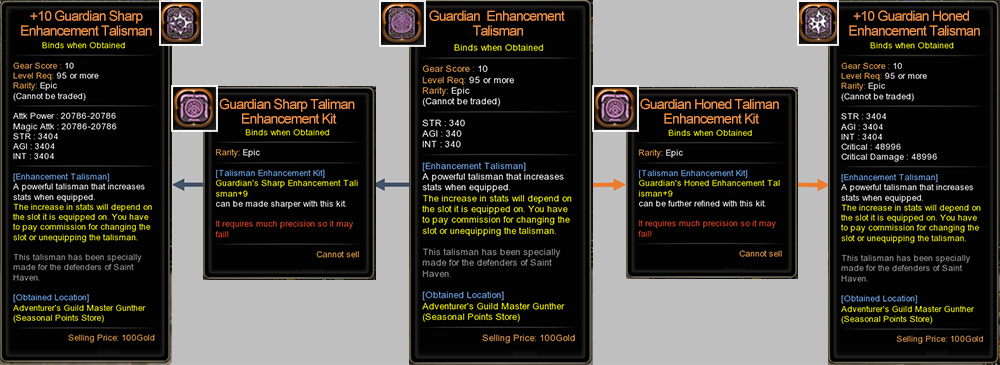
- You can get ‘Guardian's Enhanced Talisman’ from the Seasonal Points Store or Universe Treasure Pouch.
- By using ‘Guardian's Talisman Enhancement Kit’ that can be purchased at Seasonal Points Store, you can upgrade ‘Guardian's Enhancement Talisman’.
- Enhancement effect of Guardian's Talisman differs based on the option you choose.
(Sharp : Physical Attack, Magic Attack), (Honed : Critical, Critical Damage)
- By using Guardian's Talisman Enhancement Kit, you can upgrade Guardian's Talisman to up to +10 Enhancement Level.
(Enhancement may fail from +2 Enhancement Level onwards)
- There is no penalty such as a reduction in Enhancement Level even when enhancement fails.
- You cannot equip multiple Guardian's Enhancement Talismans.
- By using the Converter that can be purchased at the Seasonal Points Store, you can change the selected options once. (Honed→Sharp, Sharp→Honed)
- Enhancement Level remains unchanged even when the Converter is used to change the options.
4. Seasonal Points Store Revamp
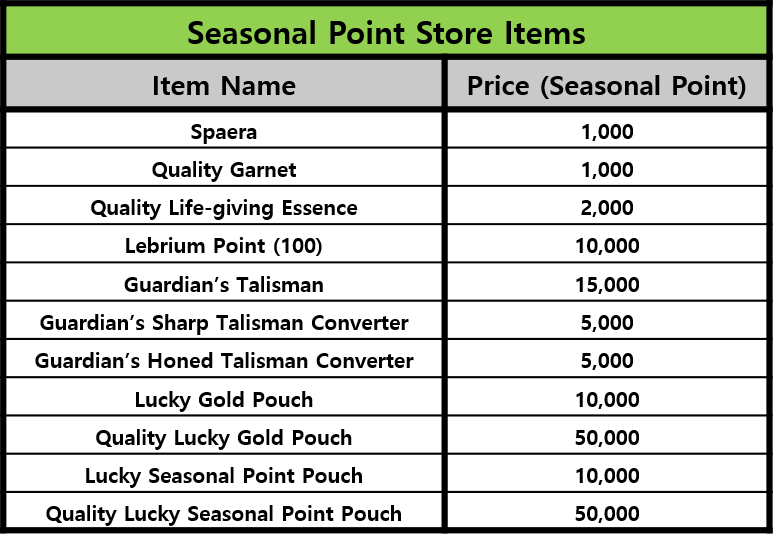
■ Seasonal Points Store Revamp
- Items sold at the Seasonal Points Store (Gunther) have changed.
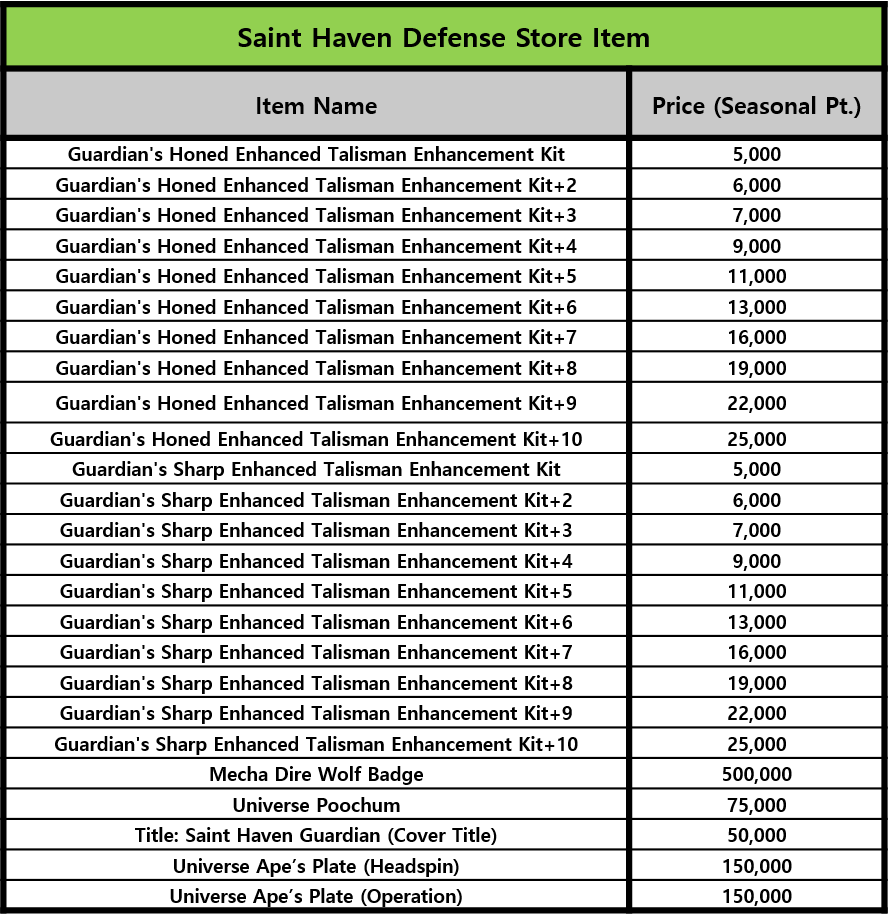
■ Seasonal Points Store Revamp (Saint Haven Defence Store)
- Saint Haven Defence Store will only be open during the event period.
- You can use Saint Haven Defence Store at Adventurer's Guild Master Gunther.
- You can buy a kit to upgrade Guardian's Talisman.
- You can also buy hard-to-get items by using points.
5. Priestess of Darkness Nest Points Store
New Lancea Specialisation Skill Heraldry
- You can buy Skill Heraldry for Lancea's new specialisations (Knightess, Avalanche, Randgrid) at Priestess of Darkness - Nest Points Store.
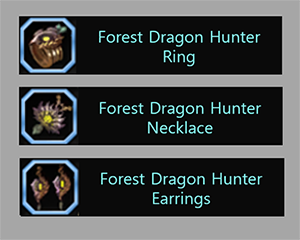
6. Forest Dragon Accessory Icon
Icon has been added for Forest Dragon Accessory.
7. Battle Training Ground Guide and Quest List Deactivated
Guides and quest list that hindered damage meter usage in Battle Training Ground have been removed.

8. Buff/Debuff UI Improvements
- Buff and debuff information of monsters are now shown in icons.
- HP gauge layout for monsters has changed.

- As before, last hit target becomes the main target and a total of 3 targets including secondary targets are shown but only the main target’s debuff is shown.
[Player]
- Debuff icon will be shown on the monster that got debuff from you. Debuff from other party members will not be shown and if another party member has inflicted a debuff that is the same as the one you inflicted, debuff information will be refreshed to party member’s debuff information since debuff effects cannot be stacked.
[Monster]

- Boss and named monsters’ buff and debuff will be shown in icons.
- Buffs applied to a monster by another monster are also shown in icons and they will take priority over player’s debuffs. When needed, monsters can also apply debuffs on other monsters and a special icon will be used for such cases.
- Even when a monster gets debuff from another monster, the icon will take priority over player’s debuffs.
- Boss and named monsters may be immune to certain debuffs. In this case, skill effect and icon will not be shown.
[Others]
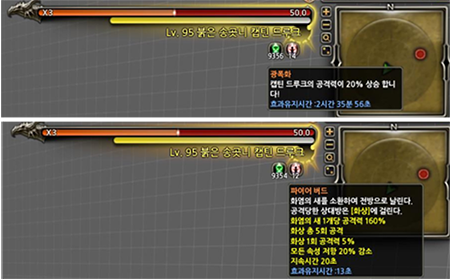
- You can see the tooltip when you hover your mouse on the icon.
- Up to 15 buff and debuff icons are shown. If there are more than 15 buffs and debuffs applied, the icons will not be shown in chronological order.
- Apart from debuffs, special conditions such as burns and poisoning will also be shown in icons. However, improvements still need to be made on icons for skills that inflict many special conditions and stacking the effects. The improvements will be made in future patches.
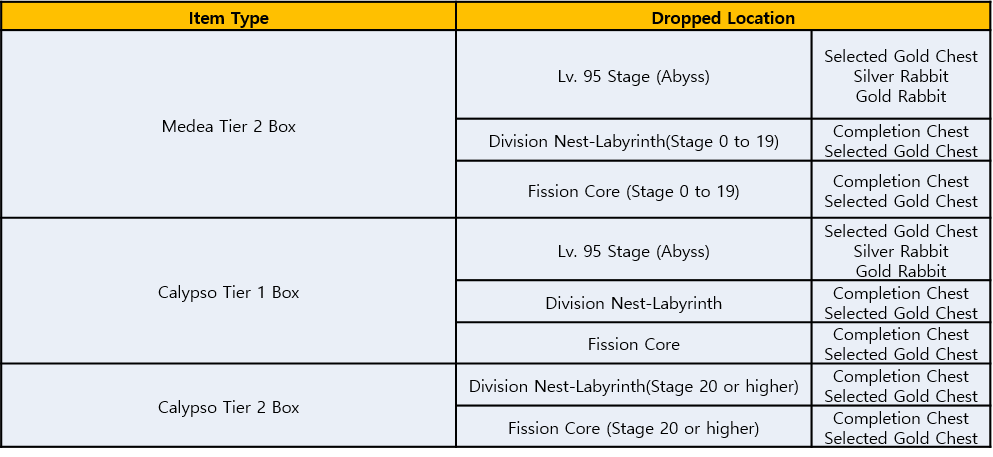
■ Dropped Tier Items
- When you clear [Lv. 95 Stage (Abyss)] [Division Nest (Labyrinth)] [Fission Core], you can get Tier Item Box at a set rate.
- Dropped items include from Medea Tier 2 item to Calypso Tier 2 +20 item.
- You can get a tier item when you open the box and drop rate for the item [part] and [enhancement level] are different.
■ Tier Item Disassembly
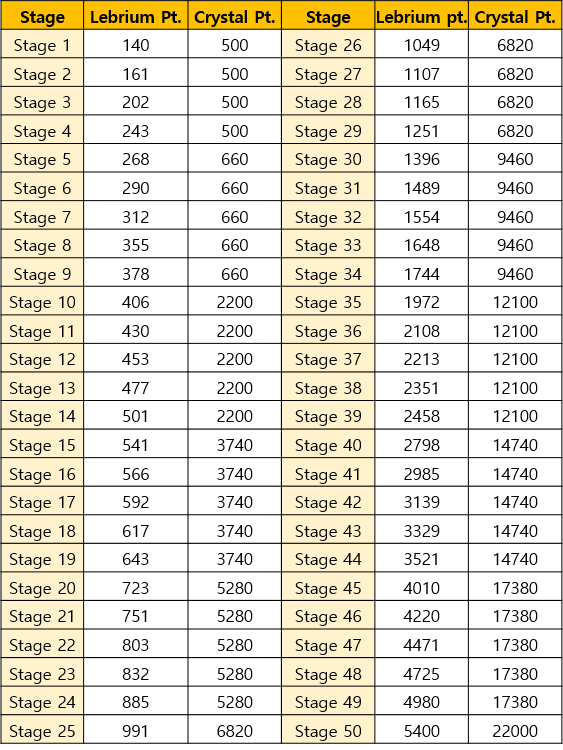
- When you disassemble [Medea Tier 1 +0 to Calypso Tier 2 +19 items], you can get Lebrium Points.
- The higher the tier and enhancement level, the more Lebrium Points you can get.
- As before, you can get the Origin of Calypso (Quality) when you disassemble Calypso Tier 2 +20 item.
10. Unified Level Skill Revamp
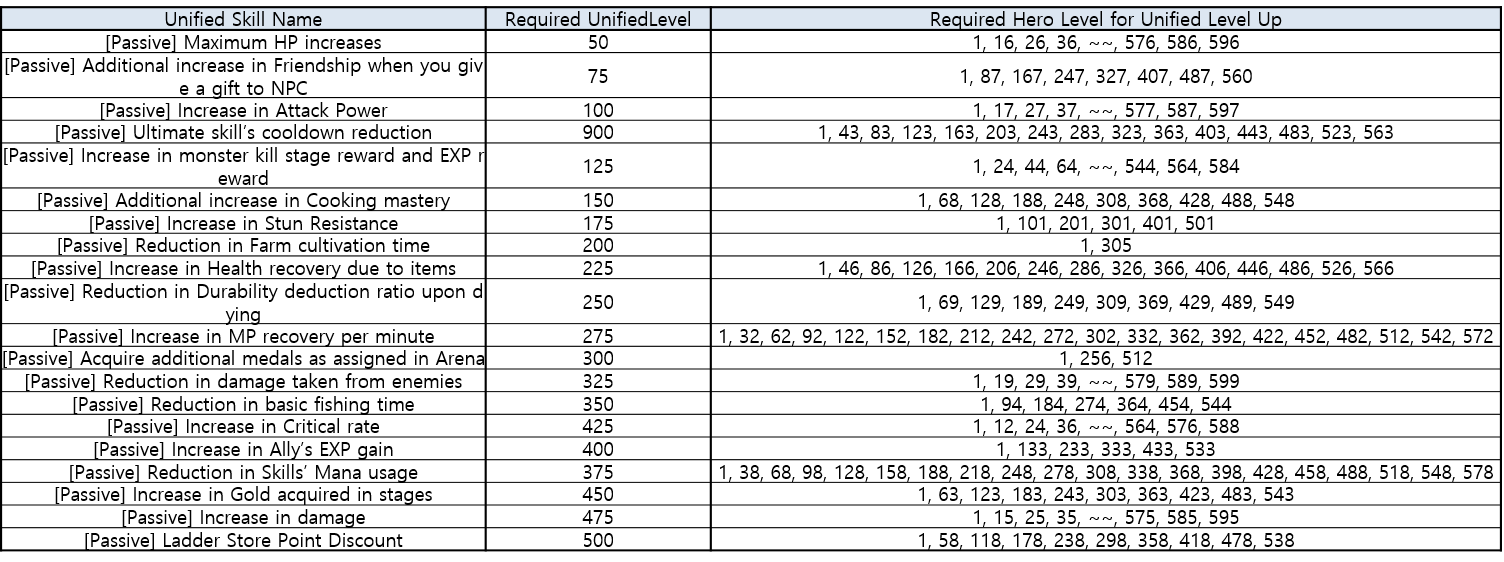
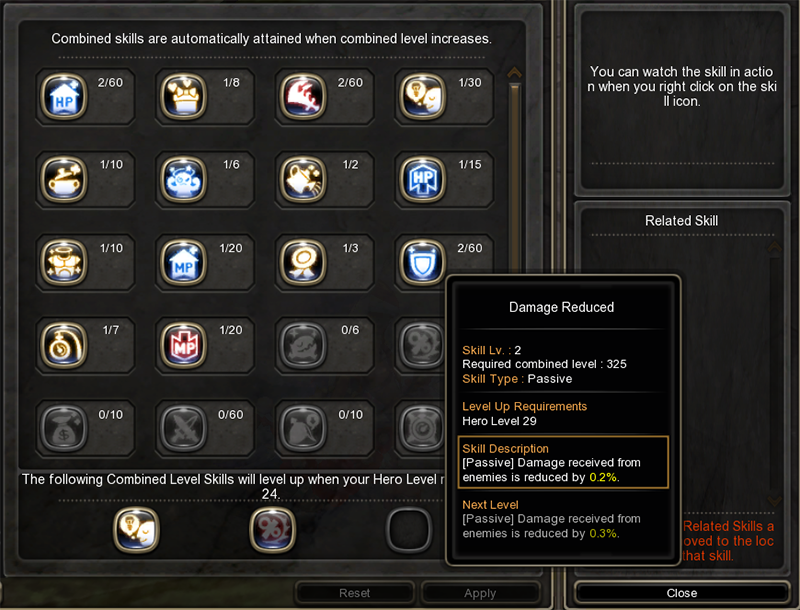
■ Changes have been made to Combined Level Skills.
- Changes have been made so that all acquired Combined Skills are applied at the same time without the need of selecting Combined Skills to be applied.
- As before, Combined Skills will be acquired automatically when you meet the prerequisite combined level for each skill.
- Character level requirements for Combined Skill has been removed and characters of all levels can now enjoy the acquired Combined Skills.
- Skill level has been applied to Combined Skills.
Combined Skills’ skill level increases automatically based on Hero Levels.
11. Changes in Fissive Dimension and Kaeron Nest
◆ Fissive Dimension
Number of monsters has increased.
- Fissioned Sunken Ship
- Fissioned West Armory
- Fissioned Lonely Cradle
Wrong monster has been changed.
- Fissioned Red Waste
◆ Kaeron Nest
A bug that prevented character from dying during Chiron Nest Stage 2 Gustos’ ice floor attack pattern when standing at a certain location has been fixed.
12. Adjustments to Lv95 Legend Dragon Gem Disassembly Results
Lv. 95 Legend rarity Dragon Gem disassembly results have been changed.
Previously, 1 or 2 Average Luminous Dragon Gem Core were dropped when disassembled but now it has been fixed to 2.

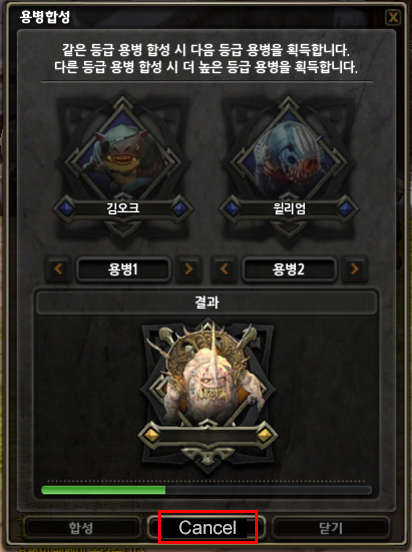
13. Added Function: Cancelling Mercenary Synthesis
A function that allows you to cancel Mercenary synthesis while it is being processed has been added.
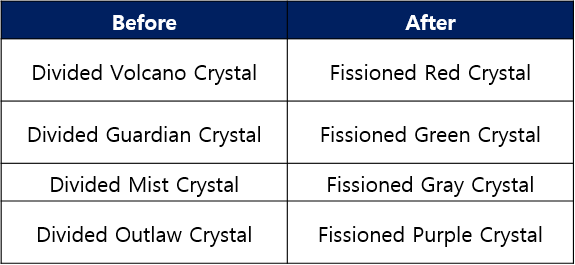
14. Names Changed for Labyrinth Haildom Materials
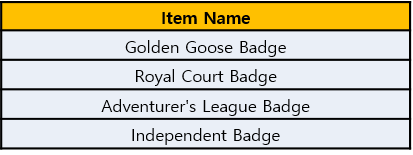
Alliance Badge can be placed in Server Storage
- Badges that allow you to acquire Alliance Points can now be stored in Server Storage.
Enhancement Success Rate Potion Removed
• You can no longer buy [Enhancement Success Rate Potion] from Guild Base Store.
■ Improvements have been made to the opening of Merca’s Port.
- Now Captain Hector will be in Merca’s Heart permanently regardless of main quest progress.
■ Green Dragon Nest Time Attack - [Growing Distrust] debuff removed
- Death of a party member no longer creates [Growing Distrust].
■ Division Nest – Changes in monster balance
- Penalty damage has increased for failing each of the monster’s unique pattern in Fission Nest Area 1.
■ System message appears when guild member quits game.
■ Changes in Monday’s Hot Spring Effect
- Monday’s Hot Spring effect, “increase in enhancement success rate”, has been changed to “increase in abilities”.
■ Party Member Click Function Removed
- In dungeons or Nests, menu does not appear when you click on other party members even in non-battle states.
■ Storing Special Storage Ticket in Server Storage
- You can now store Special Storage Ticket in Server Storage.
■ Changes in Maximum Lebrium Points
- Maximum Lebrium Points you can own has been increased to 100,000 Points.
■ Equipment Collection
- Skila equipment has been added.
■ Dropped item’s light pillar effect
- Light pillar effect for certain dropped items has been changed to be more visible.
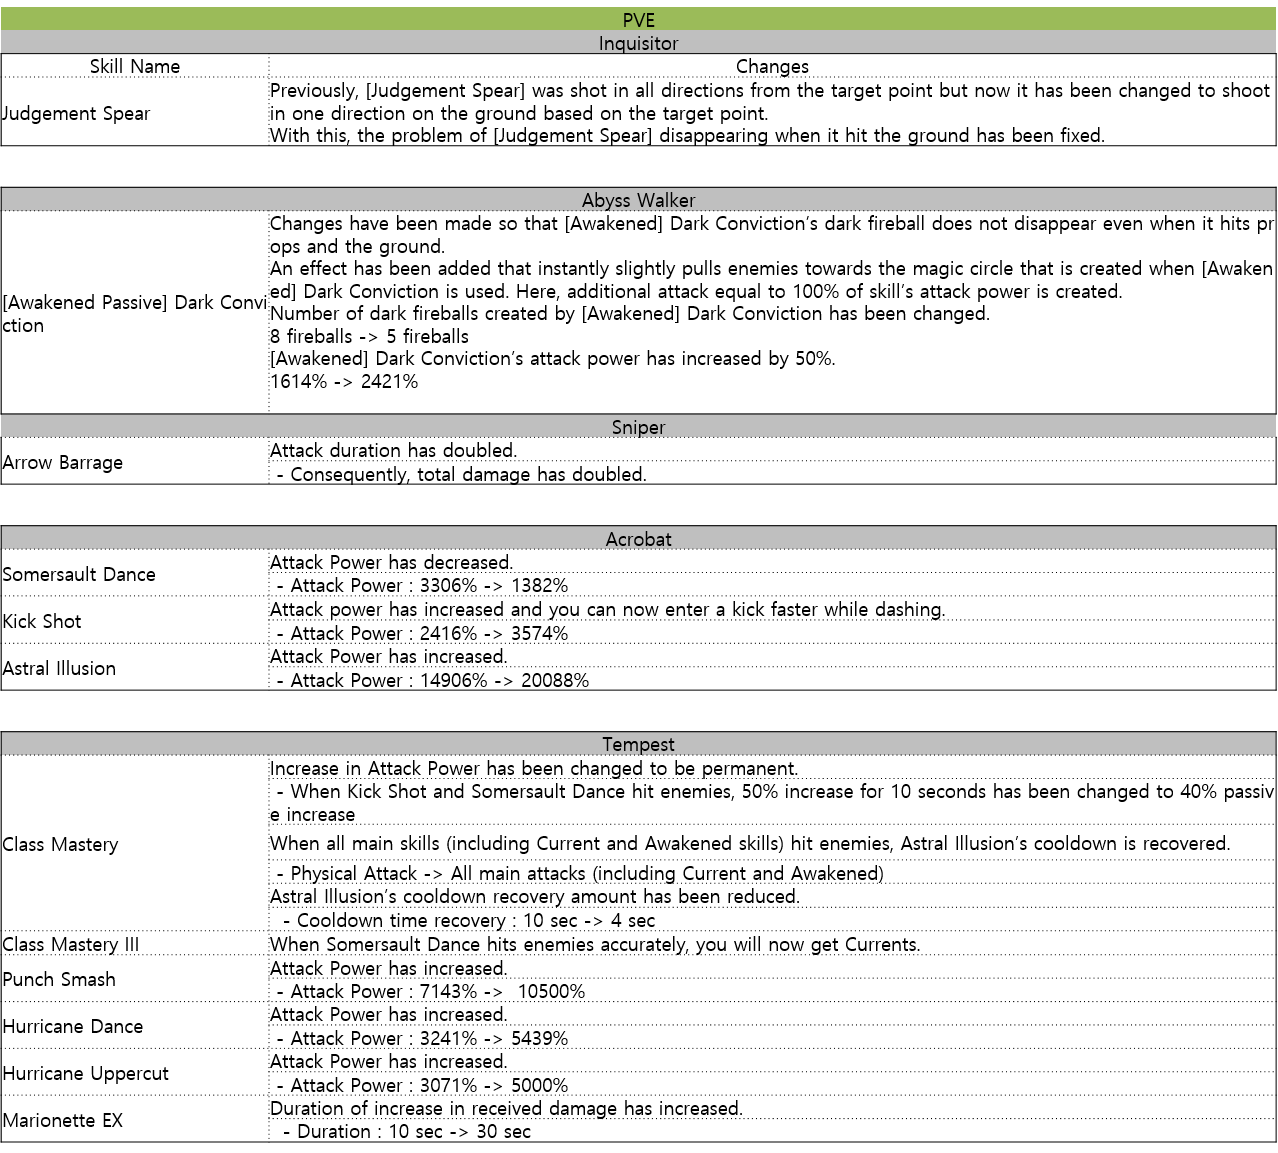
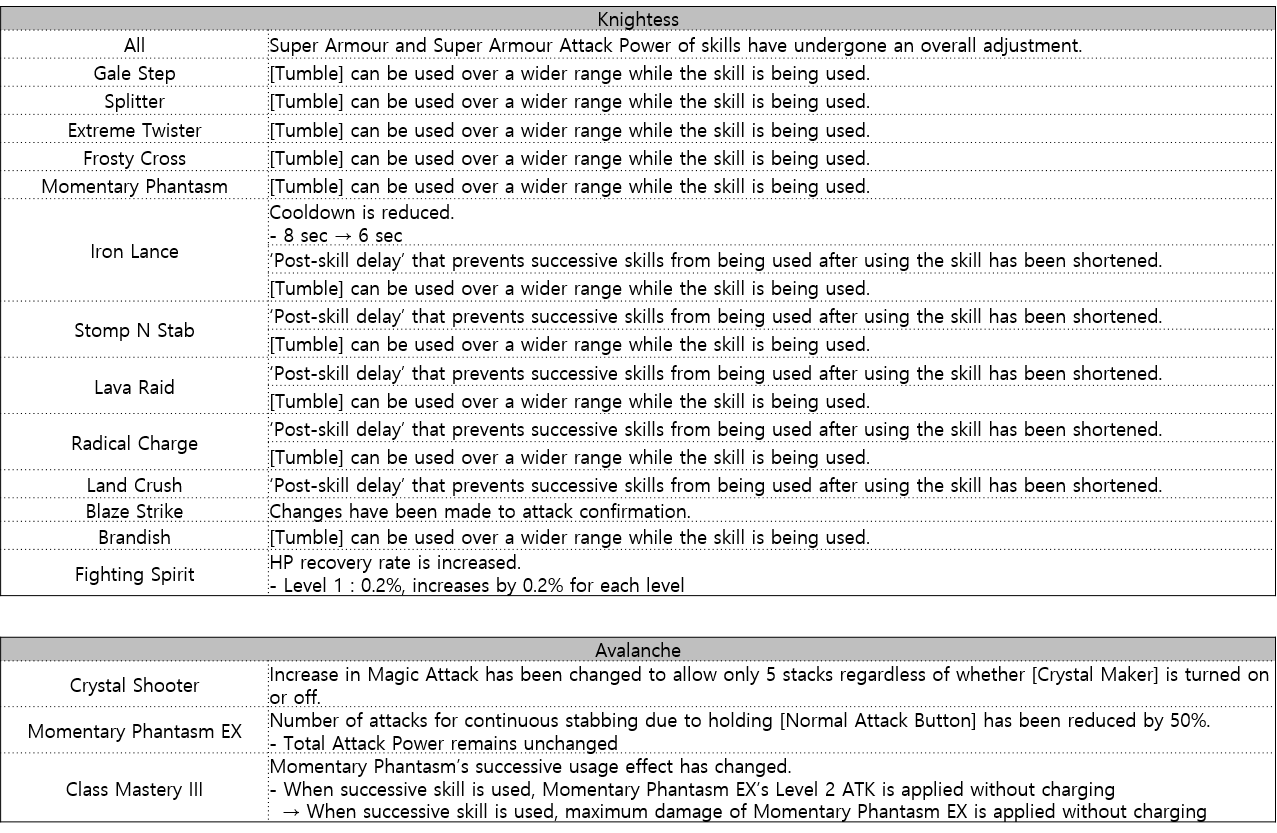
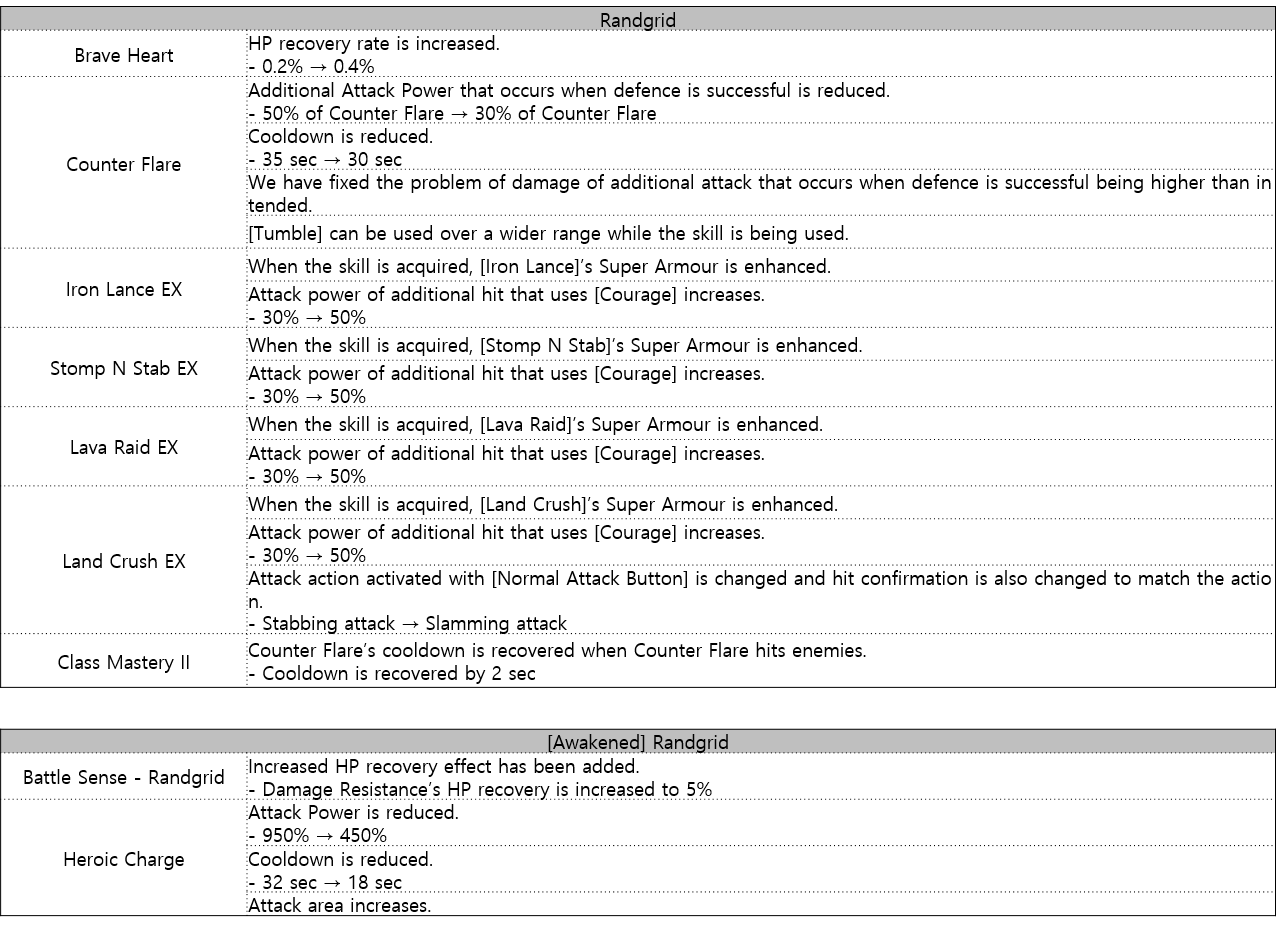
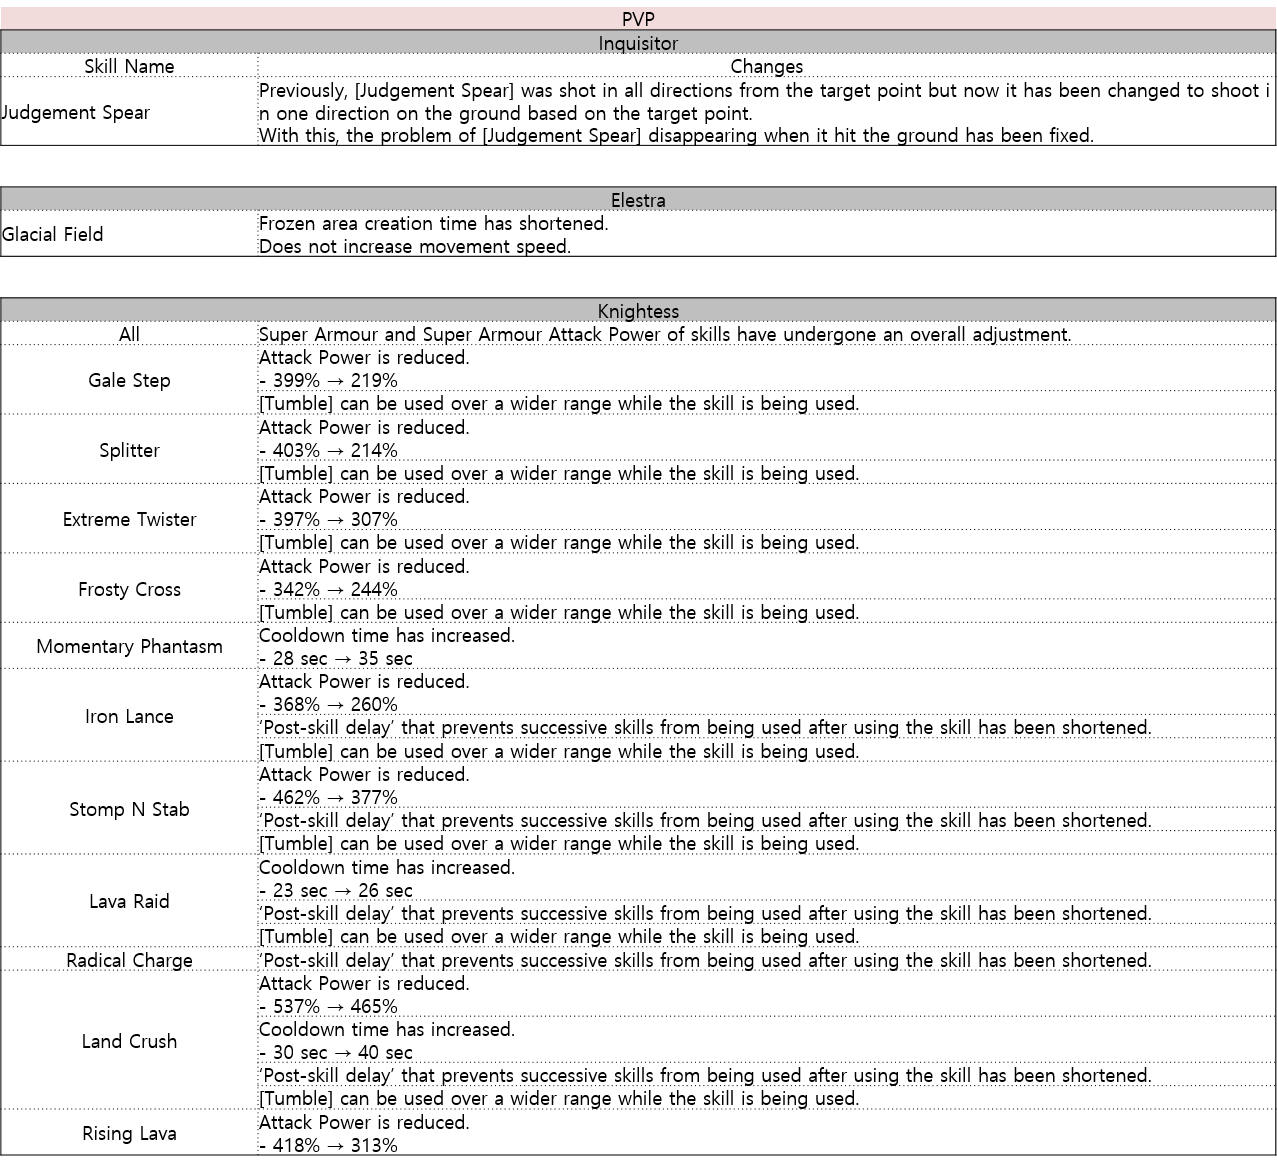
Skill Balancing
Event
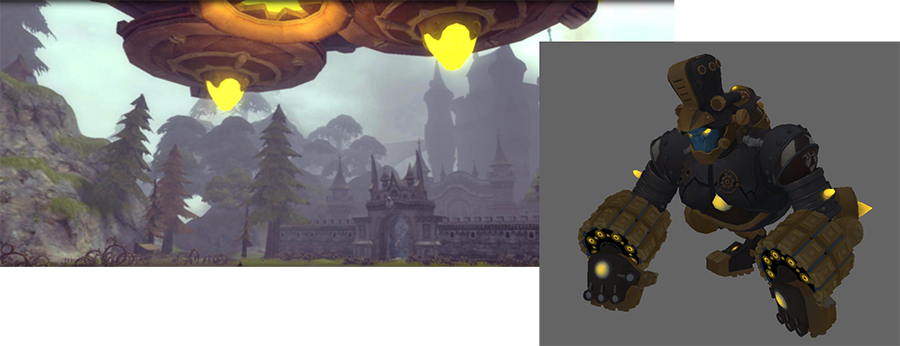
1. Saint Haven Defence: Gorilla from the Star
Saint Haven Defence has opened!
[ Saint Haven's Doomsday? ]
A mysterious unidentified flying object has appeared in Saint Haven! Where did it come from? And who’s inside?
What’s certain is the airship is hostile and if its attacks cannot be stopped, it might be the end of Saint Haven.

[Entry Info]
- Level requirements : From Level 40 to Level 95
- Entry Ticket : None
- Number of players : 4 to 12 players (cannot enter in a party)
[Location]
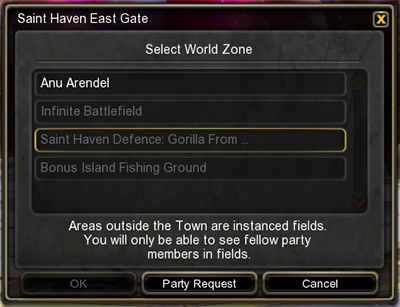
- Saint Haven Gate (East/West/South Gate) → Saint Haven Defence : Gorilla from the Star → Enter event map
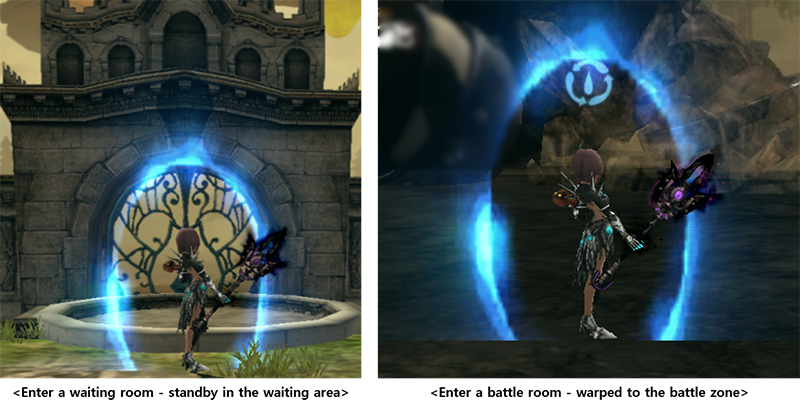
[How to enter]
You will enter a waiting room or a room where battle has already begun.
When you enter the waiting room, you will have to wait until minimum number of players (4 players) are gathered.
When you enter a battle room, you will be warped to the battle zone.
[Resurrection]
Life Stones and Resurrection Scrolls are not used when you resurrect in Saint Haven Defence.
1) Resurrection Cooldown
Resurrection cooldown is applied when you die in Saint Haven Defence.
You cannot resurrect by yourself during the cooldown period so you need to get help from other players.
Cooldown ends when another character enters the resurrection key (default: R) after approaching the dead player.
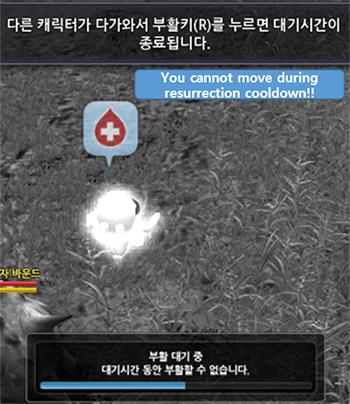
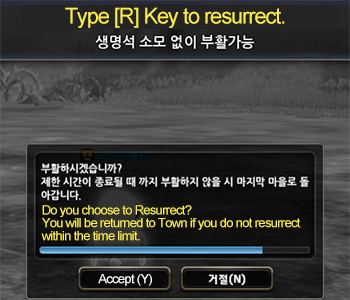
2) Time limit after Resurrection Cooldown
When resurrection cooldown ends, resurrection time limit will begin.
If you do not resurrect within the time limit or refuse to resurrect, you will be forced to enter town.
[Cooldown Time]
When you clear Saint Haven Defence or leave the stage halfway, you will have to wait for 15 minutes before entering Saint Haven Defence again.
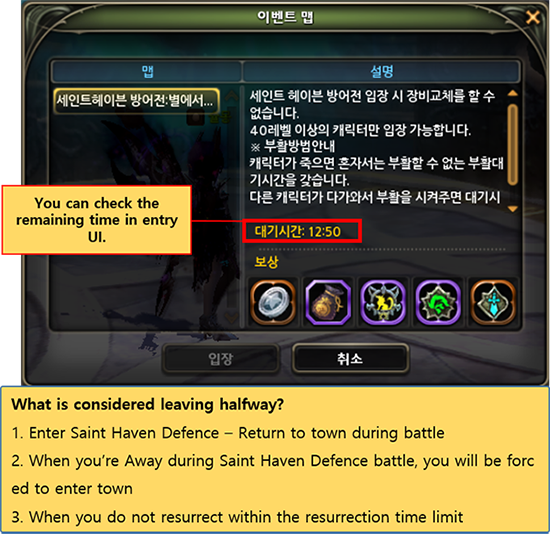
[Take Note]
- Saint Haven Defence is balanced.
- Durability is not reduced in Saint Haven Defence.
- You cannot enter Saint Haven Defence in a party.
- All skill cooldown are initialised when you first enter Saint Haven Defence and they will not be initialised when you die in battle.
Saint Haven Defence Rewards
- You can get additional Seasonal Points based on the damage amount.
- When defence is successful, you can get “Universe Treasure Pouch”.
- When you open “Universe Treasure Pouch”, you can get one of the items inside.
- When defence is successful, you can get additional Seasonal Points at a set rate.
- When defence is successful, you stand a low chance of acquiring Mecha Dire Wolf Medallion.

*Item names called "King Kang's Plate" should be displayed as "Universe Ape's Plate" in the game.
[Saint Haven Defence : Gorilla from the Star Schedule]
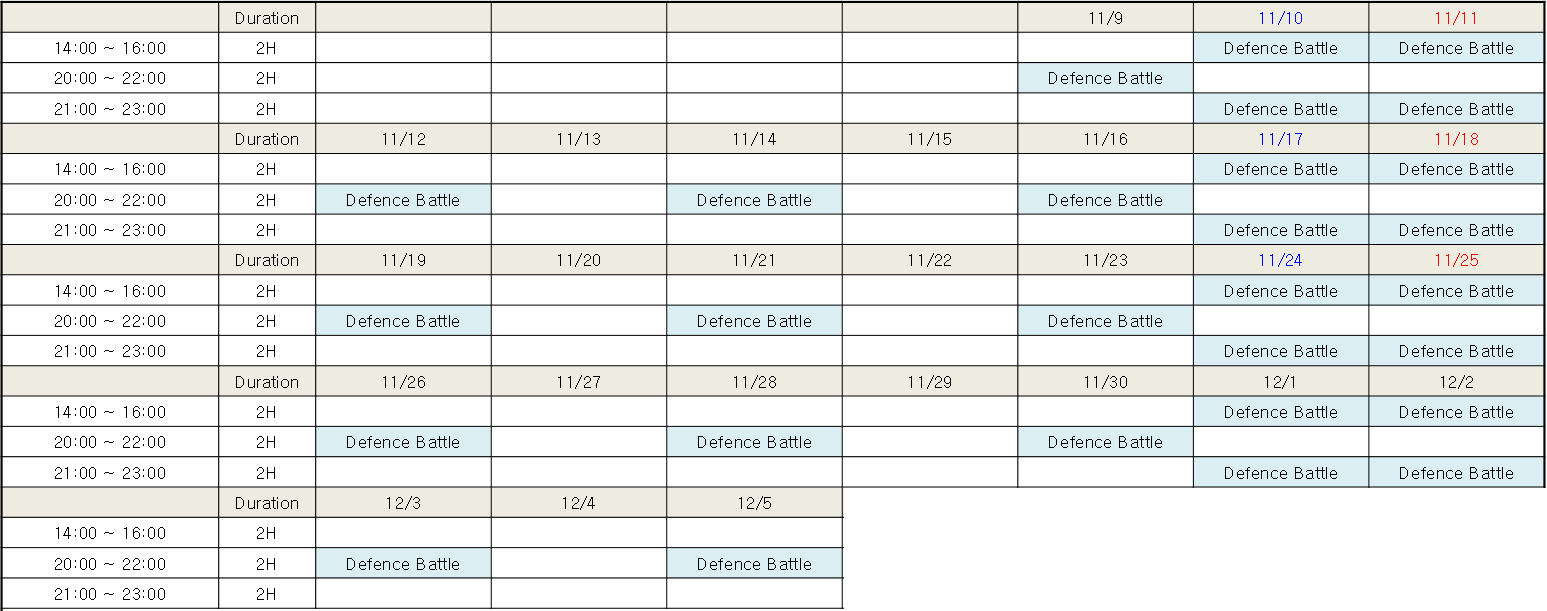
* Note: The schedule could be changed depend on the date December Update.
[Best Hero Tournament Ended]
- Best Hero Tournament has ended and can no longer be used after the update.
[Halloween Event Ended]
- Halloween Event has ended and can no longer be used after the update.
- NPC Cassie's Halloween Store will be available for one more month, until the December Update patch date.
Cash Shop Update
1. November Costume: Lingerie Costume

2. Gerrant Transformation W/T/D (Casual Look)
Geraint Casual Look Transformation
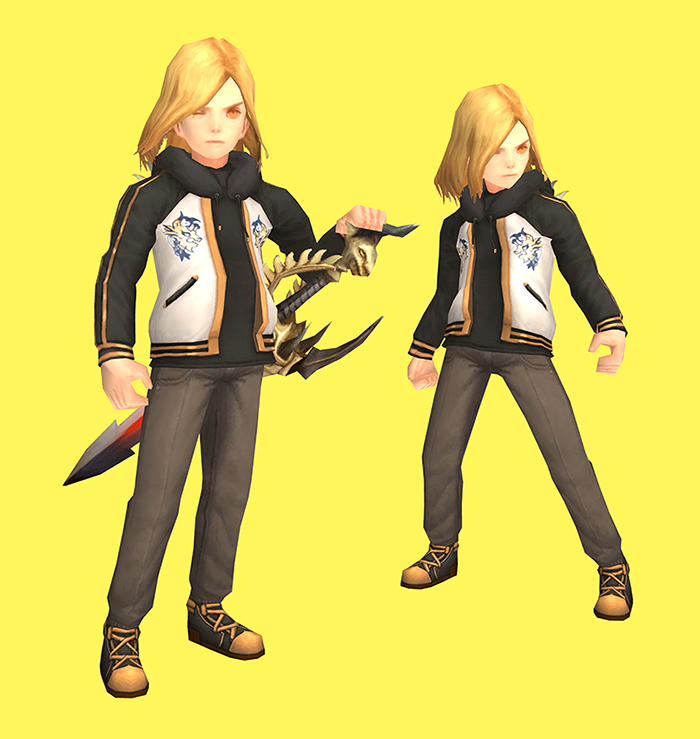
Cheerful Blessed Hero Wings/Decal/Tail
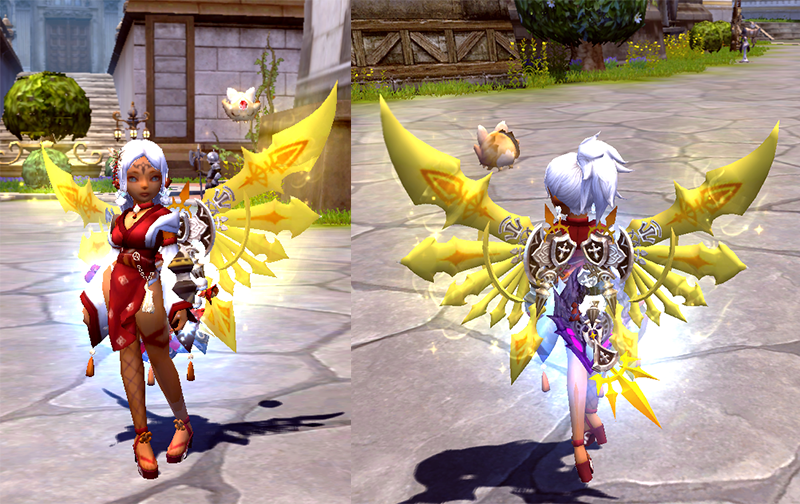
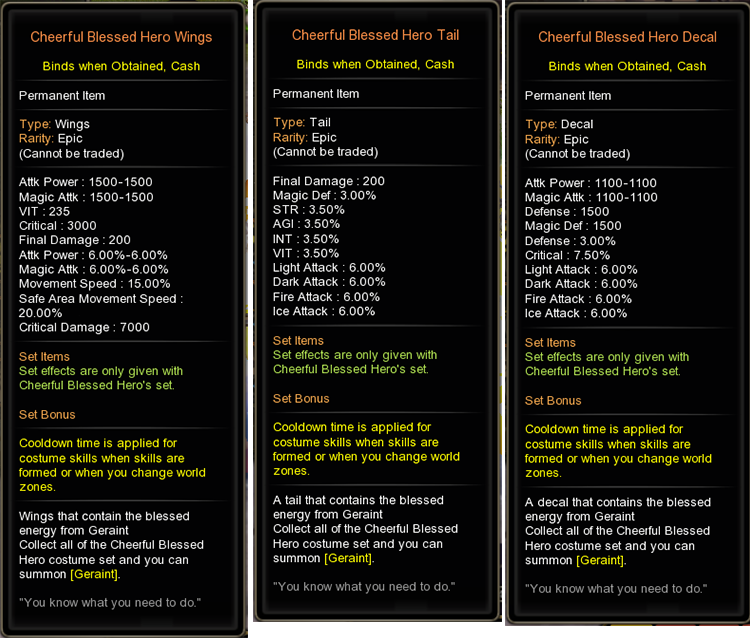
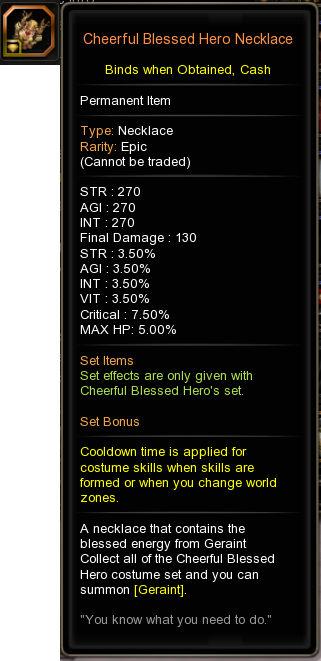
Cheerful Blessed Hero Necklace
Cheerful Blessed Hero Weapon
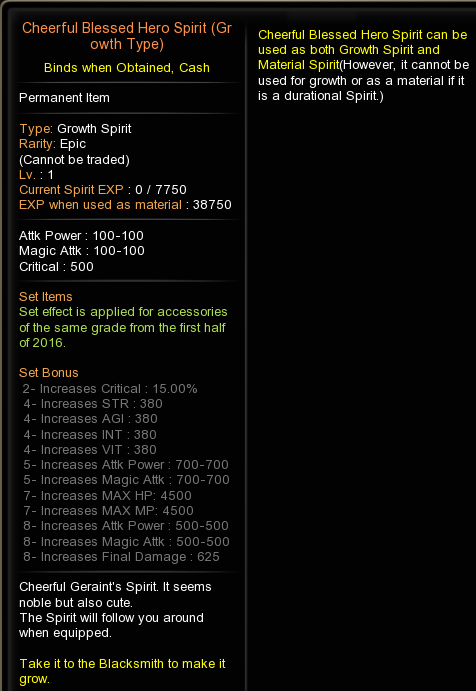
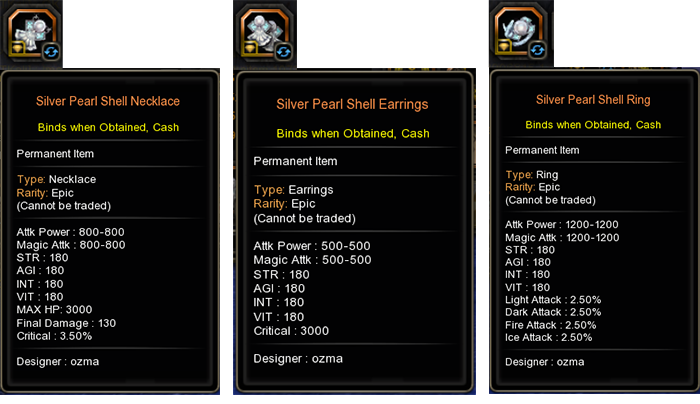
We are sorry to say that the previous photo attached had incorrect stats.
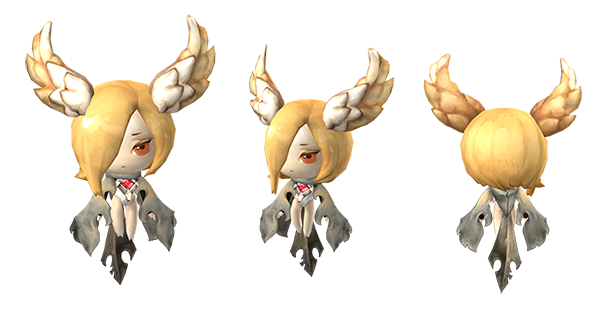
Cheerful Blessed Hero Spirit (Growth type)
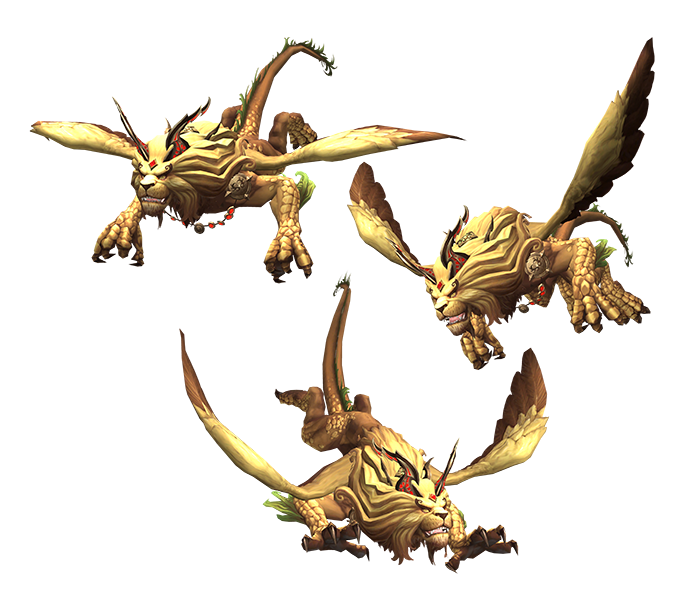
Blessed Gold Dragon Mount
- <
- >